
TheHulk Pre-release v0.1.0
TheHulk is a cartridge for every 16-bit Atari: the 520 and 1040 ST, STE, Mega ST, Mega STE, TT and Falcon030. Plug it into the cartridge port and your Atari gets drives on an SD card, drives on your home network, a built-in flash drive, and real internet — no hardware mod, no hard disk interface, and nothing to install on the Atari itself. It's the successor to SideTNFS.
Two chips do the work:
- Lattice iCE40UP5K FPGA — speaks the cartridge bus in hardware.
- ESP32-S3 — Wi-Fi, the SD card and the web server.
Everything is open source under GPL-3.0: the hardware (KiCad), the FPGA gateware (Verilog), the ESP32 firmware (ESP-IDF) and the Atari-side software all live in the GitHub repository.
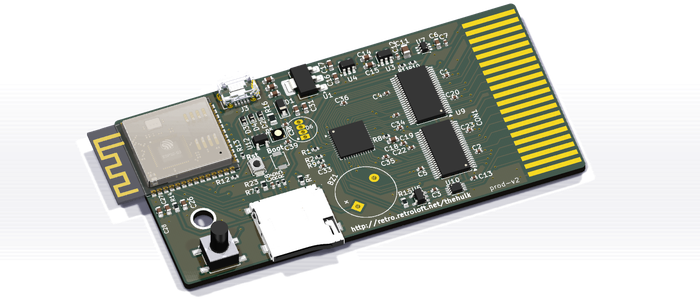
v0.1.0 is a pre-release. Firmware and software run on real hardware and have been tested on the development board (dev-v2, which carries a plug-in ESP32-S3-DevKitC clone). The production board (prod-v2, pictured below) hasn't been built or tested yet, so firmware support for it will be confirmed once the first boards come back. Early adopters order at their own risk; if you'd rather not be first, it's fine to wait for a test report.
Download v0.1.0 ·
GitHub repository
Falcon proof
TheHulk was built and tested on a Falcon030 (TOS 4.04) from day one, alongside the ST, STE, Mega STE and TT. Its faster 68030 and bus get handled explicitly: GEMDRIVE checksums every block read from or written to the cartridge and fetches it again if anything is off, so your copies come out complete and correct; the 68030's cache is flushed wherever code runs from the stack; and the 68030 gets its own command timeout. Tested so far on the Falcon: all three drive types, including booting from the flash drive; STinG internet (that's where the 99 KB/s figure below comes from); a hard disk running side by side; the cartridge emulator; and the floppy emulator.
Drives, with nothing to install
The cartridge itself contains the GEMDOS driver, so there is nothing to put on your boot disk. TheHulk offers up to nine drives, of three kinds:
- SD card — a folder on a microSD card (FAT).
- TNFS — a share on a TNFS server on your network, the same protocol as ACSI2TNFS and SideTNFS.
- Flash drive — about 10 MB inside the ESP32 itself. Always there, no card or network needed, and bootable: give an ST without a hard disk drive letter C: and it boots straight from it, AUTO folder and desktop included.
It works alongside a hard disk (tested with HDDriver, AHDI and ICD). On original TOS you get drives C: to P:; MiNT, MagiC and EmuTOS can use the full A: to Z:. If a TNFS server is unreachable, the drive doesn't hang — it shows a small text file explaining why instead.
Details: docs/DRIVES.md
Real internet, with STinG
Your Atari gets its own IP address on your Wi-Fi, so it can ping, browse the web (with HighWire), use FTP, and be reached from other machines on the network.
An installer on the flash drive, STINGINS.TOS, sets up everything in one go: STinG 1.26, Christian Zietz's TCP.STX, and TheHulk's own CART_NET.STX driver. Measured speed is about 99 KB/s on a Falcon030 downloading a 1 MB file over HTTP — and your drives keep working at the same time, there's no separate "network mode" to switch into.
Details: docs/NETWORK.md
A web page for setup
Open http://thehulk.local/ from a phone, tablet or PC and you get a full settings page — no program needed on the Atari at all.
- Status: Atari on/off, Wi-Fi connection, IP address, firmware version.
- Settings: drives, Wi-Fi (with a network search), the device name (handy with several cartridges around), the clock, and AP mode.
- AP mode: hold button 1 for 10 seconds and TheHulk opens its own Wi-Fi network with the same page at http://192.168.4.1/ — useful at a retro meeting or show away from home.
Details: docs/WEB.md
Cartridge emulator
TheHulk can become almost any ordinary cartridge: games, tools, diagnostic ROMs. Images live in \CARTS on the SD card — upload them from your phone, pull them straight from the roms.sidecartridge.com catalogue, or copy them over yourself.
Press Use and reset the Atari: the image is copied into TheHulk's own flash, so it's there again at every power-on. A short press of button 1 switches straight back to GEMDRIVE. Some cartridges don't run on the Falcon: they were written for the ST and its 68000, years before the Falcon came out — that's the software on the cartridge, not TheHulk. Diagnostic-type cartridges like DiagROM and EmuTOS also need a reset after power-on to kick in.
Details: docs/CARTRIDGE.md
Floppy emulator
.ST and .MSA disk images from the SD card's \FLOPPIES folder show up as drive A: or B:, and the Atari boots from them — disk swaps work without a reset, for multi-disk games. TheHulk's own drives can sit alongside the floppy emulator, or be left out entirely so every byte of memory stays free for the game. Works on every 16-bit Atari: ST, STE, Mega ST(E), TT and Falcon.
Details: docs/FLOPPY.md
Network clock and configuration tool
TheHulk fetches the time over the internet (NTP), so your Atari's clock is right at every start. THEHULK.PRG, a GEM program on the flash drive, lets you manage drives, Wi-Fi and the clock from the Atari itself, without going near the web page.
Status LED
A single RGB LED tells you what's going on: green while the cartridge or floppy emulator is in use, white in AP mode, and blue when there's no Wi-Fi yet. The production board also has a footprint for an optional round 5 mm LED, for mounting through a case.
How it works
The cartridge port is read-only — the Atari cannot write to a cartridge. So TheHulk's commands travel the other way around: the Atari "sends" a command by reading from a special address, the address itself carries the meaning, the FPGA catches that read and hands it to the ESP32, and the answer comes back as the data the Atari reads. That's how a read-only port ends up doing networking and disk writes.
- Startup: when the Atari powers on, the ESP32 loads the FPGA's bitstream over SPI (~50 ms), puts the cartridge image (GEMDRIVE) into the FPGA's on-chip RAM and enables the cartridge — about 0.3 s after power-on, well before even the fastest Atari (an ST on TOS 1.04) looks for a cartridge, at around 0.67 s.
- Bus timing: the FPGA answers every Atari read in hardware, fast enough for a 68000 bus cycle.
- Commands: the Atari writes nothing — it reads from special addresses in the cartridge space, the FPGA raises an interrupt to the ESP32, which does the real work (SD card, network, flash) and places the answer where the next read will find it.
- Power: the board never feeds power back into a switched-off Atari. The ESP32 side can run happily from USB while the Atari itself is off.
The hardware
The production board (prod-v2) measures 84 × 42 mm. The main chips are an ESP32-S3-WROOM-1 module (16 MB flash, 8 MB PSRAM) soldered directly to the board, a Lattice iCE40UP5K FPGA in a QFN-48 package, and two SN74LVC16T245 level shifters.
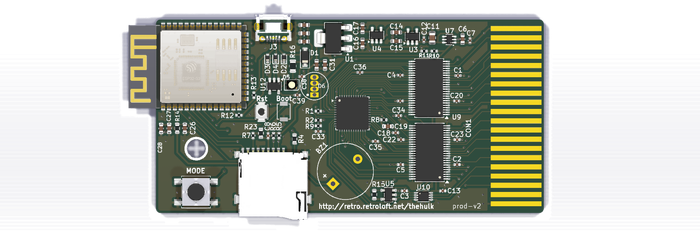
On the board: a native USB micro-B port for power, flashing and the console; a microSD slot; a status LED (WS2812B); one tall button that can poke through a case lid; a separate reset button; and the gold-finger edge connector for the cartridge port itself.
Everything is SMD and can be assembled entirely by JLCPCB. Two parts are deliberately left off for you to add yourself if you want them: a buzzer, and a round 5 mm addressable LED for mounting in a case.
Details: docs/hardware-v2.md
Ordering the PCB at JLCPCB
Download thehulk-v0.1.0-hardware-prod-v2-jlcpcb.zip from the v0.1.0 release. It contains everything JLCPCB needs:
thehulk.zip— the gerbersbom.csv— the bill of materials, already with LCSC part numberspositions.csv— part placement, already with JLC's rotation corrections
- At jlcpcb.com, upload
thehulk.zip. - Choose 2 layers, 1.6 mm thickness, HASL surface finish, and set gold fingers to Yes — the edge connector plugs straight into the Atari.
- Switch on PCB Assembly, top side.
- Upload
bom.csvandpositions.csv. - Check the placement preview: every part should sit on its pads and face the right way.
- JLC may flag the USB connector and the small status LED as "difficult to process" — that's expected, just accept it.
- Extended parts carry a small one-off setup fee per part type, per order.
About hand-soldering: the FPGA is a QFN-48 with a 0.5 mm pin pitch and a large thermal pad underneath. It is not, or only with real difficulty, solderable by hand — the thermal pad needs reflow or hot air. For almost everyone, letting JLCPCB assemble the board is by far the better option. Hand assembly is really only for people with hot-air or reflow experience.
There's also a dev-v2 hardware zip in the same release, for the development board with a plug-in ESP32-S3-DevKitC — note that it is made for the common DevKitC clones (N16R8), whose pin rows are 25.4 mm apart: 2.54 mm wider than Espressif's original ESP32-S3-DevKitC-1, which does not fit. Mainly useful if you're developing the firmware itself.
Firmware and software
All downloads are on the v0.1.0 release page:
thehulk-v0.1.0-esp32s3.bin— the complete firmware, for a first install. Flash it at address0x0over USB with esptool, with the Atari switched off — this also clears any saved settings.thehulk-v0.1.0-esp32s3-app.bin— app only, for updates at0x20000. Keeps your settings.thehulk-v0.1.0-atari.zip— THEHULK.PRG, CART_NET.STX and STINGINS.TOS. These three are also already built into the flash drive.
python -m esptool --chip esp32s3 -b 460800 write_flash 0x0 thehulk-v0.1.0-esp32s3.binThe firmware checks retroloft.net for a newer version and shows a green bar on its own web page when one is available.
Status
Your Atari, finally on the network — with drives that just appear. TheHulk is running on real hardware today: the firmware, the FPGA gateware and the Atari-side software all work on the development board. The production board is the next step: the first boards are being ordered. Follow along, or jump in, at the GitHub repository.