Unofficial, open-source hobby firmware
SideTNFS
Network drives for your Atari ST, powered by SidecarTridge and a Raspberry Pi Pico W or Pico 2 W.
SideTNFS gives your Atari ST normal GEMDOS drive letters backed by a TNFS network share or a local SD card. Programs open and save files directly — no floppy images and no traditional Atari hard-disk images needed for everyday use. Since v1.1.0 it can also emulate a floppy drive from disk images, for the times you do want one.
What is SideTNFS?
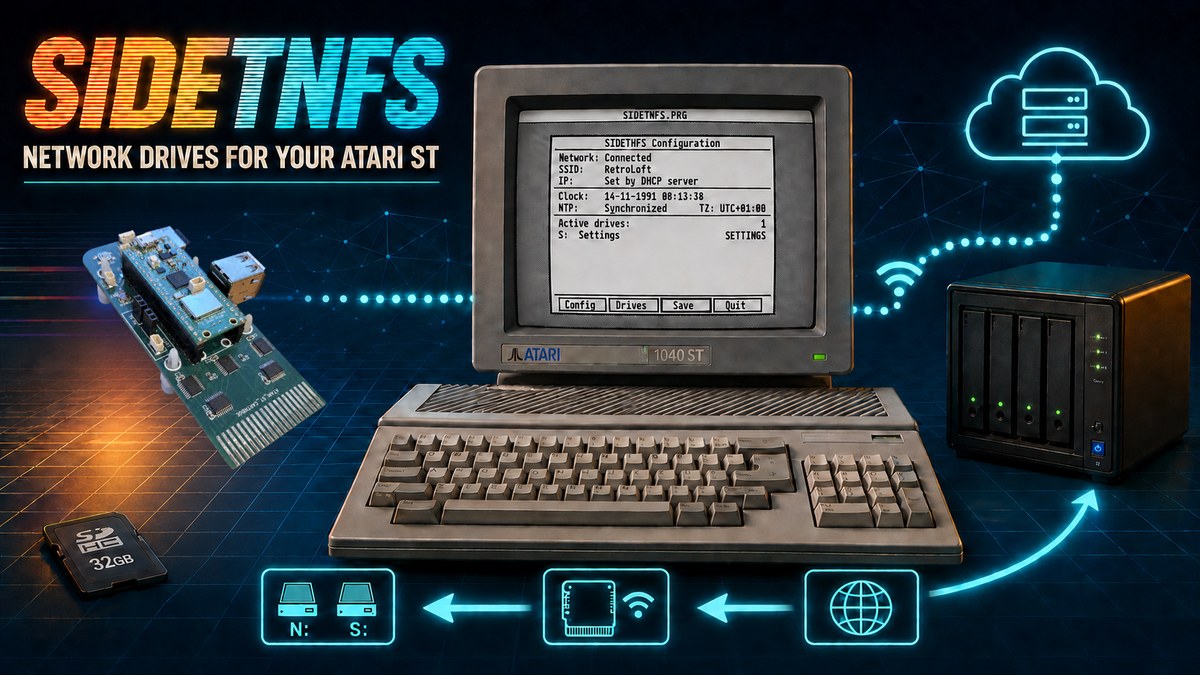
SideTNFS is alternative, open-source firmware for the Raspberry Pi Pico W or Pico 2 W used on SidecarTridge hardware. Through a component called GEMDRIVE, it makes network storage and local storage available to an Atari ST as ordinary GEMDOS drive letters — the same kind of drive letter TOS already uses for a floppy or hard disk.
In practice, that means the Atari can use files and programs straight from the network or an SD card, without needing floppy disk images or a traditional Atari hard-disk image to hold them. A separate companion app, FLOPPY.PRG, adds optional floppy-disk emulation on top of this — see Floppy drive emulation below.
SideTNFS started out from the original SidecarTridge firmware and has since been significantly simplified and refocused around one job: reliable network and local drives. It concentrates on:
- TNFS network drives
- GEMDRIVE integration
- Configurable drive letters
- Optional SD storage
- Floppy-disk emulation via FLOPPY.PRG
- The built-in SETTINGS drive
- Wi-Fi connectivity
- RTC / NTP clock synchronization
- On-Atari configuration through SIDETNFS.PRG
The original SidecarTridge hardware and firmware architecture are the foundation SideTNFS was built on — full credit for that groundwork belongs to the SidecarTridge project (see Credits and open source).
Key benefits
Direct TNFS access
Use files straight from a TNFS server, without copying them onto a floppy or hard-disk image first.
Up to eight volumes
Configure up to eight GEMDRIVE volumes at once, alongside the built-in SETTINGS drive.
Normal drive letters
Every configured drive shows up as an ordinary Atari drive letter, just like a floppy or hard disk.
IP address or hostname
Point a drive at a TNFS server by IP address or by hostname — SideTNFS resolves it via DNS.
Optional local SD drive
Add a local SD-backed drive alongside your network drives when you want storage that doesn't depend on Wi-Fi.
Configure from the Atari
Set up Wi-Fi, drives and the clock directly from the Atari, using the included SIDETNFS.PRG tool.
RTC / NTP sync
Fetch the current time over the network at boot and use it to set the Atari's clock.
Floppy emulation, too
No floppy images needed for everyday files — but when you do want them, FLOPPY.PRG can emulate drive A: or B: from .ST disk images on TNFS or SD.
How it works
- Atari GEMDOS
- GEMDRIVE
- SideTNFS on Pico W
- Wi-Fi / TNFS server
- An Atari program asks for a file through GEMDOS, exactly as it would for a floppy or hard disk.
- GEMDRIVE, running as part of SideTNFS, intercepts that request.
- The Pico translates the request into the TNFS network protocol.
- The file is read from the TNFS server over Wi-Fi.
- To the Atari, the whole exchange feels like talking to a normal hard disk.
The Atari itself never needs a TCP/IP stack, a modern network driver or any extra networking software — SideTNFS handles the network side entirely on the Pico.
Requirements
- Original or compatible SidecarTridge hardware.
- Raspberry Pi Pico W or Pico 2 W.
- An Atari ST-family computer.
- A Wi-Fi network.
- A TNFS server of your own, for network drives — though SideTNFS ships pre-configured with a public, read-only RetroLoft test server, so you can try it immediately without one.
- A USB data cable, for installing firmware.
- An optional microSD card, if you use the SD backend or floppy-image storage.
- FLOPPY.PRG, a separate download, if you want floppy-disk emulation.
SideTNFS is primarily developed and hardware-tested on a Mega STE with TOS 2.06. Feedback and test results from other Atari systems are welcome.
Installing and updating the firmware
Never insert or remove SideTNFS while the Atari is switched on.
- Switch the Atari off.
- Fully disconnect SideTNFS from the Atari.
- Connect the Pico to a computer over USB while holding down the BOOTSEL button.
- Copy the matching
.uf2file onto theRPI-RP2drive that appears —sidecart-pico_w.uf2for the original Pico W, orsidecart-pico2_w.uf2for a Pico 2 W. - Unplug the USB cable.
- With the Atari still off, plug SideTNFS back in.
Installing the file meant for the other board simply won't boot — it doesn't damage anything, so if you're unsure which Pico is inside your cartridge, it's safe to try the other one. For more on entering BOOTSEL mode and general troubleshooting, see the firmware update guide on GitHub. Wi-Fi and drive settings are stored separately from the firmware image and are preserved across a normal update.
SIDETNFS.PRG — configure it from the Atari
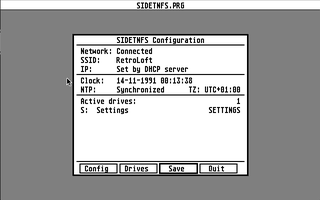
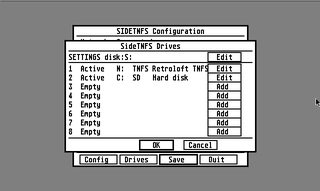
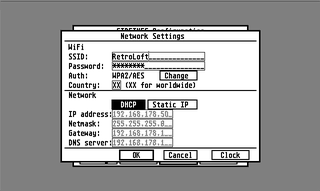
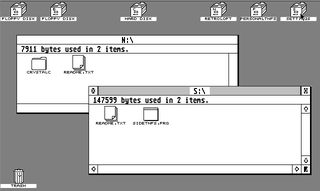
SIDETNFS.PRG is the native Atari ST configuration tool, included on the built-in SETTINGS drive. From it, you can view and change:
- network status;
- SSID and IP address;
- the Atari's date and time;
- NTP status and UTC offset;
- the currently active drives;
- network and drive configuration — add, edit, disable or remove drives, and change Wi-Fi settings;
- saved settings, written to the Pico's flash memory. Installing a firmware update never overwrites an existing, saved configuration.
The tool also shows the currently installed firmware version, and lets you know when a newer firmware release is available.
This check only warns you. SideTNFS never downloads or installs firmware
automatically — updating always means the manual BOOTSEL / .uf2 process
described above.
Drive management
Up to eight volumes can be active at the same time, in addition to the built-in SETTINGS drive. Each configured drive has:
- a drive letter;
- a recognizable nickname;
- a backend type — TNFS or local SD;
- a TNFS hostname or IP address (for TNFS drives);
- a UDP port (for TNFS drives);
- a mount path.
Out of the box, drive N: is already configured this way, pointing at a public, read-only RetroLoft TNFS test server — so you can try SideTNFS immediately, without setting up a server of your own first. It's just a starting point: change its settings, disable it, or remove it from SIDETNFS.PRG, and add your own TNFS or SD drives instead, for example:
| Drive | Nickname | Backend |
|---|---|---|
| N: | RetroLoft | TNFS |
| O: | Public Server | TNFS |
| P: | Local Storage | SD |
| S: | Settings | Built-in |
S: is the read-only SETTINGS drive that SideTNFS always provides. It gives access to SIDETNFS.PRG and to on-cartridge documentation, so the tools to configure SideTNFS are always available, even before any network drive is set up.
What is TNFS?
TNFS (Trivial Network File System) is a lightweight network file system originally designed for retrocomputers and embedded devices — small, simple to implement, and easy on limited hardware like a Pico.
- Files stay on the server as ordinary files and directories — nothing is repackaged into a special image format.
- TNFS itself has no login step — no username or password is required.
- Public TNFS servers are often set up read-only.
- A TNFS server on your own LAN can be used read/write, depending on how that server is configured.
SideTNFS ships with a ready-to-use example: a public RetroLoft TNFS test
server at retroloft.net:16384, read-only, meant for quick tests and
demonstrations rather than as a place to store anything. Its contents may change or be
removed at any time, and it can be temporarily unavailable during maintenance.
TNFS is not a modern, encrypted transport: it does not offer the kind of security guarantees you'd get from HTTPS, SFTP or a VPN. Treat it as a protocol for trusted local networks, and don't use it — the public RetroLoft server included — to store or transfer confidential or sensitive data. If you run your own TNFS server (for example tnfsd, open source for Linux, macOS and Windows), export only a dedicated directory of public files, prefer read-only mode, run it as an unprivileged user, and restrict access with filesystem permissions and a firewall rather than exposing it openly on the internet.
Hostnames and DNS
You can point a TNFS drive at a plain IP address:
192.168.178.10or at a hostname:
tnfs.example.org
SideTNFS resolves hostnames via DNS. If a configured hostname can't be found, that drive
shows a readable NET_ERR.TXT file describing the error instead of simply
failing silently.
Optional SD storage
Alongside network drives, SideTNFS also supports an optional local SD-backed drive. This is additional storage, not a requirement for using TNFS — a SideTNFS setup with only network drives, and no SD card at all, works fine.
Format the card as FAT16, FAT32, or exFAT — a single-partition layout, multi-partition cards aren't supported. FAT32 offers the widest compatibility with older Atari software; exFAT suits very large cards. A regular quick format from Windows, macOS or Linux is enough, no Atari-specific tools needed.
Floppy drive emulation New in v1.1.0
SideTNFS can also emulate a virtual Atari floppy drive, loaded from an ordinary
.ST disk image stored on a TNFS server or a microSD card — no physical
floppy disk or drive required. It works through the standard GEMDOS/BIOS disk vectors, so
it's compatible with ordinary GEMDOS software. Software that bypasses GEMDOS entirely —
custom loaders, copy protection, or direct floppy-controller access — won't work
correctly, or at all, under this kind of emulation.
Floppy emulation is run from a separate companion app, FLOPPY.PRG, launched from the GEM Desktop rather than from the SETTINGS drive:
- Browse
.STimages on up to eight remembered TNFS or SD sources, with full long-filename support and search within the current directory. - Keep a persistent list of up to 60 Favorites, shared across all sources.
- Build a temporary, up-to-eight-image Carousel for multi-disk games — a short press of SELECT on the cartridge switches to the next disk while the game is running.
- Start a single image immediately with Start Now, without building a Carousel first.
- Choose whether the emulated drive is A: or B: — one virtual floppy drive at a time, not both at once — and whether your normal SideTNFS TNFS/SD drives stay available alongside it, or run "Floppy Only".
- A long press of SELECT exits floppy mode (confirmed by the onboard LED); do a manual Atari reset afterwards to return to normal SideTNFS operation.
- Usable with keyboard or mouse. Requires medium or high Atari screen resolution; low resolution is not supported.
RTC and NTP time sync
- SideTNFS can fetch the current time over NTP when it starts up.
- That time can then be used to set the Atari's own clock.
- You configure a fixed UTC offset by hand, to match your local time zone.
- Automatic time zones and daylight-saving switches are not supported yet.
Friendly network error handling
When Wi-Fi, DNS, a TNFS server or a mount isn't available, the affected drive can show a
synthetic, read-only NET_ERR.TXT file explaining what went wrong, instead of
just failing. Once the underlying problem is resolved, the message disappears the next
time that drive's directory is listed.
Categories you may see include:
- Wi-Fi not available;
- hostname could not be resolved;
- server unreachable;
- mount failed;
- no TNFS session.
Factory reset
If your configuration ever becomes unreachable, or you just want to start over, you can reset SideTNFS back to its factory default at any time — no computer or SIDETNFS.PRG needed:
- Switch the Atari off, then on again, so the Pico goes through a fresh boot.
- Press and hold the SELECT button on the SideTNFS cartridge as the Atari powers back on, and keep holding it.
- The onboard LED lights up to confirm the reset is in progress.
- Keep holding SELECT for a full 10 seconds. SideTNFS then rewrites its configuration back to the factory default — drive N: pointing at the public RetroLoft TNFS server — and restarts on its own.
Releasing SELECT before the 10 seconds are up cancels the reset — nothing is changed.
SELECT does something different during an active floppy-emulation session (see Floppy drive emulation below) — a short press switches Carousel disks and a long press exits floppy mode. Holding it for a factory reset only applies at power-on, as described above.
Long filename support
The everyday GEMDOS/GEMDRIVE TNFS and SD drives still use classic Atari 8.3 filenames —
that hasn't changed. FLOPPY.PRG's own file browser is the exception: when you're picking
a .ST image to mount, it reads the TNFS or SD directory directly and shows
the real long filenames, bypassing the 8.3 limit. Long filename support for the everyday
GEMDOS drives themselves is still in development.
Downloads
Latest Production firmware
sidecart-pico_w.uf2 (Pico W) or sidecart-pico2_w.uf2 (Pico 2 W).
FLOPPY.PRG
Companion app for floppy-disk emulation, released separately from the firmware.
SIDETNFS.PRG & documentation
Included on the built-in, read-only SETTINGS drive after flashing — not a separate download.
Credits and open source
- Frank Beentjes / RetroLoft maintains the SideTNFS project.
- SidecarTridge, created by Diego Parrilla, provided the original hardware and firmware architecture that SideTNFS builds on.
- AI assistance was used extensively throughout SideTNFS's development.
SideTNFS is an independent, unofficial project. It is not an official SidecarTridge product, and this page does not imply endorsement or official support from SidecarTridge or Diego Parrilla.
Join the community
There's a Discord server dedicated to SideTNFS — the place to share your setup, ask questions, report bugs, and hear about new firmware releases first.
Frequently asked questions
Is SideTNFS official SidecarTridge firmware?
No. SideTNFS is an independent, unofficial hobby project built on the original SidecarTridge hardware and firmware architecture. It is not an official SidecarTridge product.
Do I need an SD card?
No. An SD card is only needed if you want to use the optional local SD-backed drive, or floppy-image storage. TNFS network drives work without one.
Can I use SideTNFS with floppy disk images?
Yes, since v1.1.0. A separate companion app, FLOPPY.PRG, emulates a virtual floppy drive (A: or B:) loaded from .ST disk images stored on TNFS or SD — see Floppy drive emulation above.
Will floppy emulation work with any Atari game?
Only with software that goes through standard GEMDOS/BIOS disk access, which covers most ordinary GEMDOS software. Games using custom loaders, copy protection, or direct floppy-controller access won't work correctly under this kind of emulation.
Can I try SideTNFS without setting up my own server?
Yes. Out of the box, drive N: is already configured to connect to a public, read-only RetroLoft TNFS test server, so you can try SideTNFS immediately. It's meant for quick tests and demos, not for storing data — swap in your own TNFS or SD drives whenever you're ready.
Do I need software on the Atari?
SIDETNFS.PRG, included on the built-in SETTINGS drive, is used to configure SideTNFS. Once your drives are configured, using them doesn't require any extra driver software beyond GEMDRIVE itself.
Can I use more than one drive?
Yes. Up to eight configured drives can be active at once, alongside the built-in SETTINGS drive.
Can I use a hostname instead of an IP address?
Yes. SideTNFS resolves hostnames via DNS. If a hostname can't be resolved, the affected drive shows a readable NET_ERR.TXT file explaining the problem.
Can I write to a TNFS drive?
It depends on the server. Public TNFS servers are often read-only; a TNFS server on your own LAN can be used read/write, depending on how you configure it.
Does SideTNFS support long filenames?
Not yet, for the everyday GEMDOS/GEMDRIVE TNFS and SD drives — those still use classic Atari 8.3 filenames, and long filename support there is in development. FLOPPY.PRG's own file browser is an exception: it shows real long filenames when you're picking a .ST disk image to mount.
Does it update itself automatically?
No. SIDETNFS.PRG can tell you when a newer firmware release is available, but it never downloads or installs it — updating is always a manual BOOTSEL / .uf2 step.
Are my settings preserved during a firmware update?
Yes. Wi-Fi and drive settings are stored in a separate area of the Pico's flash memory that a normal firmware update doesn't touch.
What if I want to reset my configuration?
Hold the SELECT button on the SideTNFS cartridge for a full 10 seconds while the Atari powers on — the onboard LED confirms the reset is in progress. This restores the factory default configuration (drive N: pointing at the public RetroLoft TNFS server) without needing a computer or SIDETNFS.PRG.
What happens when Wi-Fi or the server is unavailable?
The affected drive can show a synthetic, read-only NET_ERR.TXT file describing the problem — Wi-Fi unavailable, DNS failure, unreachable server, failed mount, or no TNFS session. It disappears again once the drive is listed after the problem is resolved.
Where can I get help or talk to other users?
The SideTNFS Discord server is the best place — share your setup, ask questions, report bugs, or just follow along with development.
Status and limitations
- SideTNFS is a hobby project, still under active development.
- Filenames on the everyday GEMDOS TNFS/SD drives are still limited to the classic Atari 8.3 format (FLOPPY.PRG's own file browser is the exception).
- Floppy emulation only works with software that uses standard GEMDOS/BIOS disk access — copy-protected or custom-loader software won't work under it.
- Firmware installation is always manual — nothing is installed automatically.
- The UTC offset is fixed and set by hand; there's no automatic daylight-saving support yet.
- Compatibility outside the tested configurations listed above may vary.
- TNFS is intended for trusted networks, or for public servers that are deliberately offered read-only.
- The public RetroLoft TNFS test server is for testing and demos only — its contents may change or be removed at any time, and it should not be used to store data.